In the year 1808, Sir Richard Cott Hoare and William Cunnington conducted a
significant archaeological excavation into a tumulus mound, situated only a
short distance from the Stonehenge monument.
Workmen uncovered the remains of a tall, well built man lying in a fully extended
position with his head pointing toward the south.
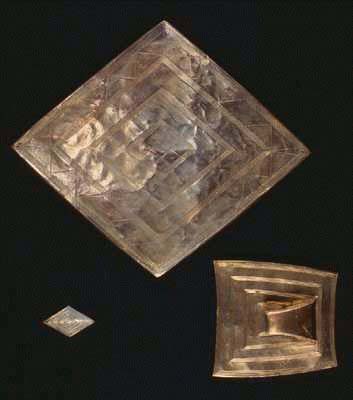
The grave also contained an assortment of valuable artefacts, including 3 fabricated
from beaten gold, attesting to the individual's importance and station within
his ancient society. Because of the presence of daggers and an axe, the deceased
man was initially thought to have been a warrior.
The totality of the artefacts recovered, however, suggested that the individual
had functioned in the capacity of a priest or architect at Stonehenge, as the
items found with the skeleton gave an appearance more akin to ceremonial or
calculation usage. Some preliminary assessments related to wooden items in an
advanced state of decay were later modified to support a scientific function
rather than a combative one.
Of these items Professor John North comments, 'Fragments of wood that the
excavators had thought were the remains of a shield were now described as the
remains of an alidade (a sighting rule) and wooden drawing board or plane table'
(see Stonehenge, Neolithic Man and the Cosmos, page 508).
There were three daggers with bronze blades and wooden handles. A series of
gold pins had held the wooden handles to the blades. Other items included a
bronze axe, as well as a mace with a circular pebble head and bone inlaid wooden
handle.
The 3 gold artefacts consisted of two intricately patterned, flat, diamond shaped
objects, overlaying a wooden base and another item thought to have been a belt
buckle or buckle loop.
Of the two diamond or lozenge shaped artefacts, one is considerably smaller
than the other and might have been a forehead ornament. Its larger counterpart,
with a length of 7.28 inches and a breadth of 6.14 inches, was undoubtedly used
as a breastplate ornament. This conclusion is supported by the fact that it
was found on the breastbone of the skeleton. It also contains small, drilled
or punched holes at its lengthwise ends, consistent with suspending the item
from the neck by a cord and having it lie against the chest.
Figure 1: The three gold items recovered from the tumulus grave near Stonehenge.
They are presently in the collection of the Devizes Museum at Wiltshire, England.
In the past two centuries there has been considerable speculation regarding
an astronomical function or mnemonic usage for the larger lozenge shaped artefact,
now popularly referred to as the Bush Barrow Lozenge. However, to date, no definitive
explanations have been forthcoming demonstrating how it could have been used
in any such capacity. Until a scientific capability is clearly found within
the intricate patterning of the lozenge, scholars must assume it had a solely
decorative or ceremonial function, or that it was a symbol of office.
THIS ANALYSIS WILL DEMONSTRATE THE FOLLOWING:
(A). That the Bush Barrow Lozenge was built as a memory device, with certain aspects specifically tailored for usage at Stonehenge.
(B). That the lozenge contains multiple coded relationships, which link mathematical endeavour at Stonehenge to similar endeavours upon the Giza Plateau of Egypt.
(C). That the measurement standard used in the construction of Stonehenge
was the British standard inch and that this measurement system has a pedigree
back to the Great Pyramid of Egypt, as well as Khafre & Menkaure Pyramids.
It will be shown that the British/ Egyptian/ Babylonian/ Sumerian system of
measurement has not drifted or been subjected to serious alteration since megalithic
times and its integrity remains intact to the present day.
(D). That ancient mathematicians of Britain, as elsewhere, understood the ratios PI (3.1416) and PHI (1.6180339) or the use of 3,4,5 triangulation, millenniums before Pythagoras.
(E). That a singular, universal astronomical system was adopted and used by many widely scattered civilisations, incorporating the same sets of numbers and measurement increments. These selfsame numbers and methods were used in many climes and at many latitudes to determine celestial cycles, to navigate or for surveying and overland mapping.
The Lozenge artefact has been scaled according to the finite dimensions provided by the Devizes Museum Curator, Mr. Paul Robinson, who wrote:
Dear Mr Doutre
Thank you for your enquiry. There are, I am afraid, no closely accurate measured
drawings of the lozenge as yet. The total dimensions (edge to edge) are 185
x 156 mm. The dimensions from the corners of the outermost engraved lines are
180 x 153 mm.
These measurements are taken from a high quality electrotype facsimile of the
lozenge made in 1920. The lozenge itself suffered an accident in the 1980's
with the result that it is believed that it may have been slightly distorted
in its repair. Leastwise any measurements now taken from the original cannot
be guaranteed as accurate.
Hope this helps. Let me know if you need any further assistance.
Yours sincerely,
Paul Robinson,
Curator.
No attempt has been made to draw a geometrically perfect lozenge and although, for the purposes of this study, a drawing of the artefact will be used, it is precisely representative of the actual artefact. Any pattern variation, linear deviation or edge damage has been accurately copied and used in the drawn replica.
All drawn replication of the Bush Barrow Lozenge was done over a precisely scaled photograph of the original artefact, adjusted as per the dimensions given by the Curator, Mr. Paul Robinson, to eliminate any minor optical distortion. This was done in the highly precise, architectural computer program, AutoCAD using the magnification component of CAD to ensure tremendous accuracy and finite detailing.
Every attempt is made to represent the Lozenge according to how ancient mathematicians
designed it and artisans fabricated it. Some minor discrepancies will be seen
in the demonstration of certain codes. This is, primarily, because the most
apparent means of finding the Lozenge centre (intersecting cross-lines in the
most central lattice diamond) shows the centre to be displaced to the left by
an average of .01455". Alternatively, the centre displacement, top and
bottom averages .02105" toward the top. These assessments are based upon
how the lozenge is orientated for the purposes of this study and that aspect
will remain constant throughout.
The analysis will show that many of these slight inexactitudes were deliberately
incised into the lozenge in an individual section or quarter for the accentuation
of particular codes. Some minor discrepancies in the geometry might be due to
damage to the lozenge or visual limitations on the part of the artisan who did
the fine engraving. Although the geometry will sometimes drift marginally off
position, it is visually clear enough to demonstrate what the design intention
was of those who conceived, fabricated and numerically coded the lozenge.
Fulcrum points for the demonstration of codes will be the four cardinal, extreme outer points of the lozenge and the four cardinal points of each reducing pattern. Another primary fulcrum will be the centre position of the most central lattice diamond.
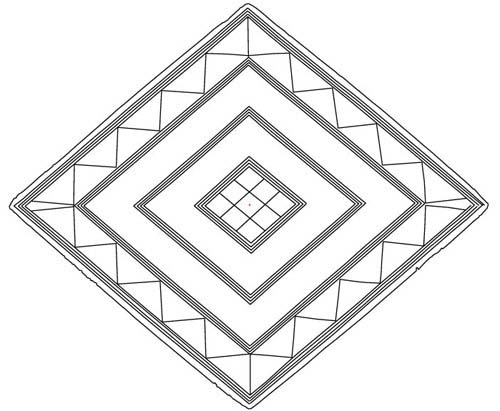
Figure 2: The redrawn and correctly scaled lozenge, based upon measurements
supplied by the Devizes Museum, Wiltshire, England. A photograph of the lozenge
was taken into AutoCAD and scaled, with photographic distortion removed. Lines
were drawn over the lozenge patterns occurring on the photo, with deviations
and edge damage remaining, as per the original artefact. The given dimensions,
obtained from The Museum Curator, Mr. Paul Robinson, are 185mm X 156mm (edge
to edge) with the outermost points of the engraved lines complying to 180mm
X 153mm.
CODES IN PI (3.1416).
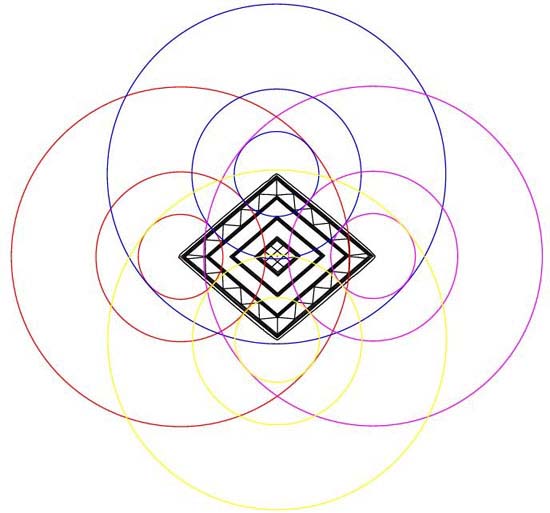
Figure 3: The Bush Barrow Lozenge has very dynamic coding in ½ PI
(1.5708 inches), PI (3.1416 inches) and double PI (6.2832 inches). The stations
for setting out circles of these dimensions are the pattern line outer points,
horizontally and the top and bottom edges of the lozenge, vertically. Let's
get in closer to see the coded junctions where circles flowing from the four
stations converge.
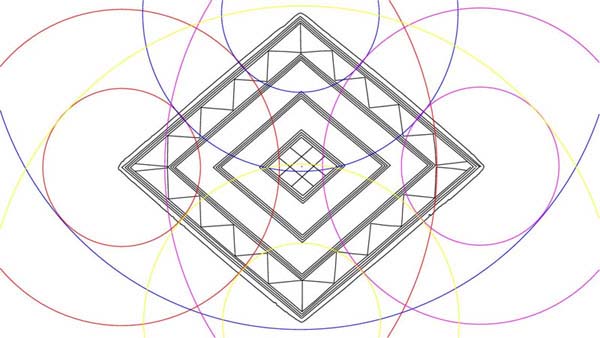
Figure 4: Note how circles set to pure PI ratio values expressed in inches
brush each other as they flow out from their four stations. Note also how circles
relate to significant parts of the inner lozenge pattern design. Circles that
are ½ PI expressions on the vertical brush the top and bottom points
of the 3rd inner diamond, whereas a double PI circle emanating out from the
left horizontal station brushes the 2nd inward diamond point to the right. The
lozenge was deliberately built to be slightly irregular from the centre to top,
bottom or side points. This was for the purpose of including additional coding.
Despite the irregularities, the PI coding running from the outer perimeter works
very well.
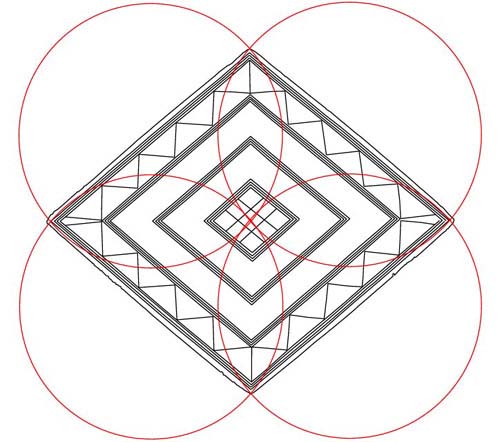
Figure 5: Another way of demonstrating the very obvious PI coding in the
Bush Barrow Lozenge. Each of the red circles shown has a diameter of 4.7124
inches, which is 3.1416 inches (PI) X 1.5. This verifies beyond any doubt that
the ancient measurement used to construct the lozenge was the British Standard
inch, which is not British at all, but Egyptian, Babylonian & Sumerian.
CODES IN PHI.
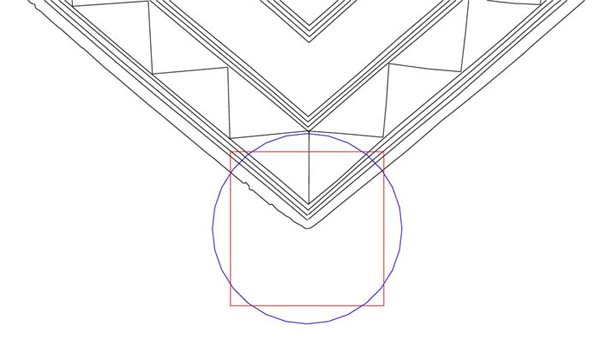
Figure 6: This is the first of a series of carefully inbuilt PHI circle
and square relationships expanding out from the bottom edge of the lozenge.
The circle has a diameter of exactly 1 PHI inch (1 inch X 1.6180339). An ancient
measurement increment much used on standing stone circle sites was the ½
Megalithic Yard (16.180339 inches). This is one of the length values positively
built into the perimeter frame of the Calendar of Coligny.
In keeping with the geometric method found on standing stone circles or coded
structures on several continents, a PHI circle is overlaid with a PHI related
square. The formula for determining the diameter of the square is that it will
be ½ PHI (.80901695) less in diameter than the circle it overlays. Note
how the circle almost touches the tip of the 2nd inward diamond, whereas the
square sits evenly with the chevron zigzag. Let's expand this PHI circle and
square method to doubled values:
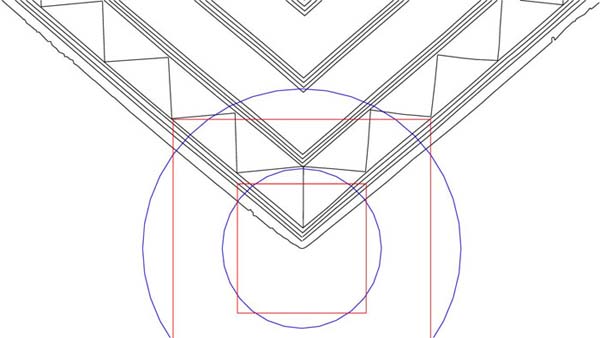
Figure 7: The circle has now been doubled and has a diameter of 3.2360678
inches. The ancient Megalithic Yard, used widely on many sites in the ancient
world, was 32.360678 inches. It was first detected by Prof. Alexander Thom and
averaged, by his estimate to 82.9 centimetres. The true Megalithic Yard was
.277 of an inch shorter than Prof. Thom's estimate and is based upon pure PHI
numerical values. The Spanish Vara of Indian Gaz are closely related to this
ancient measurement. Examples of Megalithic Yard usage are found from Egypt
to New Zealand. It was widely used in Britain and France on sites like Stonehenge,
Mt. Pleasant or Le Ménec (Carnac).
Whereas the circle flows to the 2nd inward point of the 3rd inward diamond, the overlaying square locates convincingly onto the chevron points. This occurrence demonstrates that the lower half of the lozenge was set out to PHI expansions, based upon PHI inches…there can be no mistake about this. Let's test the concept with yet another expansion.
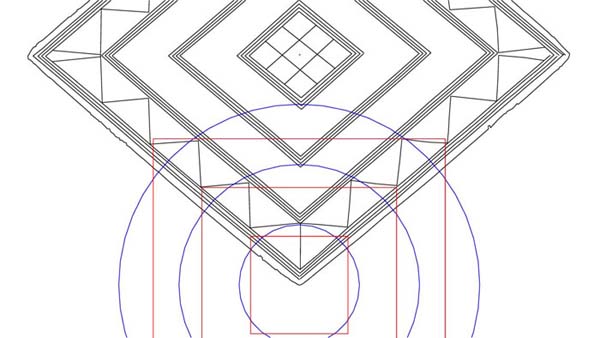
Figure 8: The circle has now been expanded to 3 PHI inches in diameter (4.854 inches) and flows through two points of the chevron and the right hand point of the innermost diamond. Remember, deliberate distortion of symmetry occurred within the lozenge for the encryption of multiple layers of codes and subtle differences exist from all 4 quarters. The ½ PHI reduced overlaying square again defines the corners of the chevron with excellent relative accuracy. Let's do one more PHI expansion.
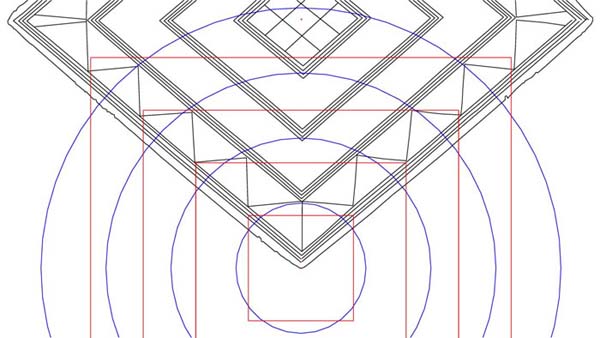
Figure 9: The circle has now been expanded to be 4 PHI inches in diameter (6.472 inches) and flows to the 2nd inner point of the 2nd inward diamond.
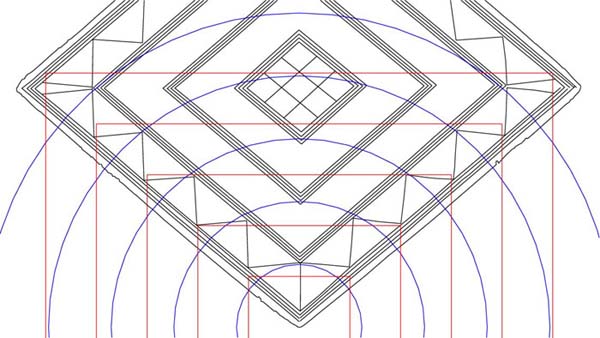
Figure 10: The full run of PHI expansions up from the bottom edge point is now complete. The diameter of this 5th circle is 8.0901695 inches. Its radius value of encroachment into the central region of the lozenge is 4.04508475 inches. The value of .80901695 is ½ PHI and was used widely on ancient standing stone circle sites. A PHI related square overlaying a circle in the geometric configuration of ancient sites would be ½ PHI less in diameter. Here's an example of this ancient astronomical/mathematical method encrypted into the Temple of the Four Winds in New Zealand…a remnant Patu-paiarehe (pre-Polynesian Maori) structure, preserved until 1983.
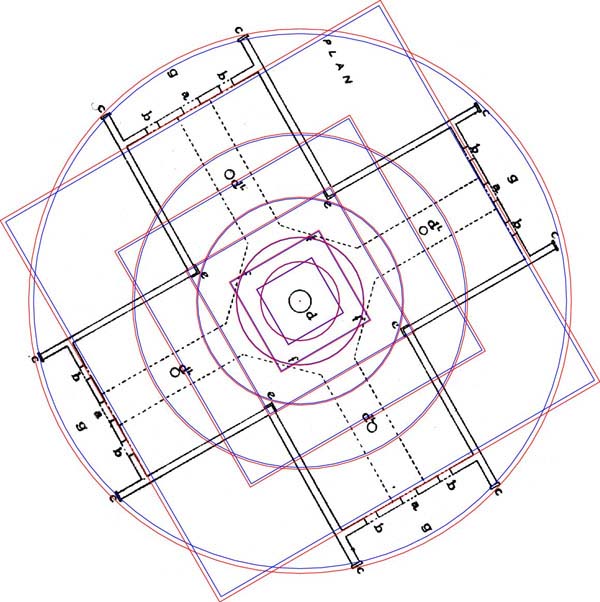
Figure 11: The ancient Crosshouse of Miringa Te Kakara, a Patu-paiarehe
temple that was continuously maintained for several centuries and survived until
1983. The plan of the building was drawn by surveyor P.G Hunt in 1958.
The Crosshouse coded two outer circles, each related to navigation. The largest
was 56 feet in diameter (sexagesimal navigational system), which brushed the
outer veranda plates of two wings. The second circle was 55 feet in diameter
("11" series league/furlong navigational system), which brushed the
outer veranda plates of the other two wings.
Just as on standing stone circle sites of Europe, each outer circle is then
subjected to a series of PHI reductions and concentric stages of diminishing
circles had their own ½ PHI reduced square overlaying them. Note how
the outermost square defines the positions of the inner doorway threshold of
each wing. The 3rd inward square reduction defines the point of exterior convergence
of each wing. The ancient structure was first built in pre-colonial times using
the Egyptian/Sumerian/Babylonian/British standard of measurement and incorporated
all of the usual, universally distributed astronomical codes found from Egypt
to Oceania.
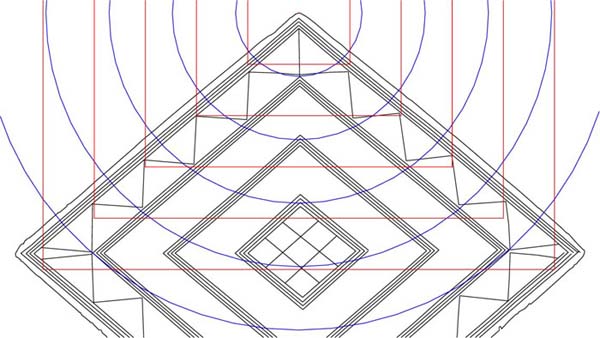
Figure 12: The expansions, made to exact PHI inches, running from the top point of the lozenge down. Again the PHI coding is consistent and the lozenge would have provided it's priest owner with excellent mnemonic reference to PHI related circles and their ½ PHI reduced overlaying squares. This method was incorporated into standing stone circle sites, although generally the circles expanded by PHI in relation to each other. At Stonehenge the PHI reducing circles are 466 feet (Avenue markers), 288 feet (Aubrey Circle), 178 feet ("Y" Holes Circle), 110 feet (Sarsen Circle), etc.
PHI & NAVIGATIONAL CODING EMANATING FROM THE CENTRE OF THE BUSH BARROW LOZENGE.
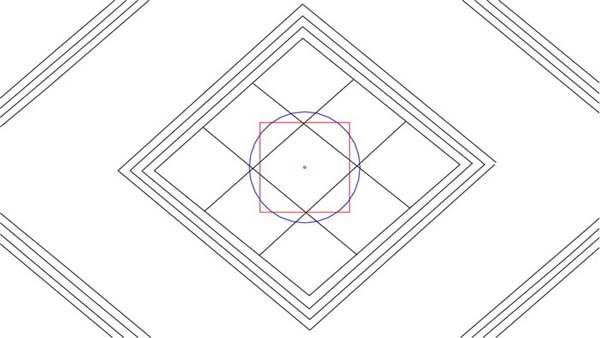
Figure 13: In the central lattice area of the lozenge a circle of ½ of an inch was intended to defined horizontal points of the most central diamond, whereas its ½ PHI reduced overlaying square defined the top and bottom points of the same diamond. One must remember that this area within the actual artefact is very small and it would have taken keen eyesight and a steady hand for the engraver to achieve perfection. Let's now expand this circle and square to "double" values.
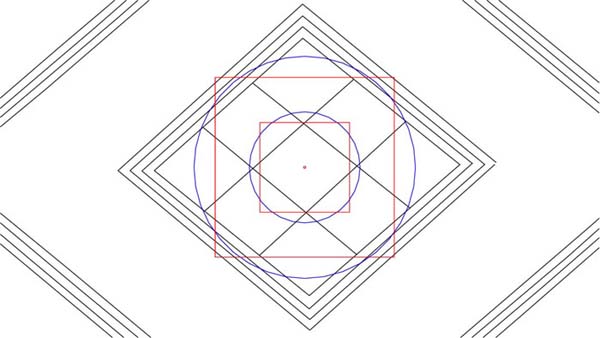
Figure 14: The 2nd PHI expansion within the central lattice and diamond area. Note how the circle now flows to 4 points of the lattice and the overlaying square to the edges of the diamond, achieving relative perfection to the right and a minor overshoot to the left. As stated, slight lapses in the symmetry of the lozenge were deliberate and the priest owner would know the region upon the lozenge where the required information was encrypted. All that was needed for taking accurate readings was a set of callipers and a very precise, finely calibrated ruler.

Figure 15: The designers of the Bush Barrow Lozenge did something incredibly clever in this new expansion. Technically the 2-inch diameter circle should have flowed to the innermost line of the 3rd inward diamond, but falls short of achieving its objective. Its overlaying square, however, perfectly defines the outer lines of the 3rd inward diamond. The square is also exactly one PHI inch in diameter (1.6180339 inches), an exceptionally important incremental value that was the foundation for a range of PHI based measurements, including the Megalithic Yard. So, the question is, what were the designers of the lozenge trying to code within the exact limits of the 3rd inward diamond? The answer lies in the "circumference of the Earth" and ancient navigational principles for grid referencing the Earth under 4 marginally different systems.
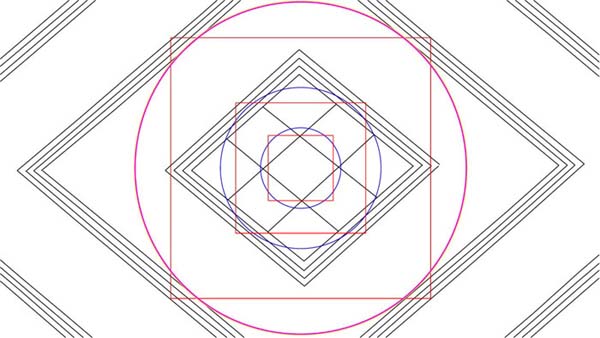
Figure 16: The large defining circle sweeping to the inner line of the 3rd inward diamond is actually a combination of 4 closely related diameters. The diameters themselves define, in reduced ratio, the lengths of 4 separate Egyptian Royal Cubit rods, each of which relate to the circumference of the Earth under 4 varied numerical systems, which are:
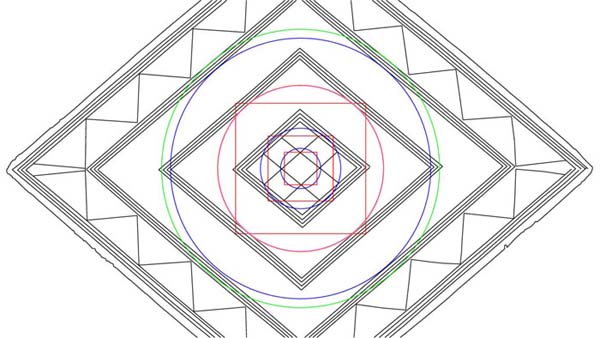
Figure 17: Two further circles defining the inner and outer limits of the 2nd inward diamond. The inner blue circle is exactly 3.2360678 (double PHI) inches in diameter and this was the basis of the Megalithic Yard @ 32.360678 inches. The green circle has a diameter of 3.456 inches and the Sarsen Circle at Stonehenge had an outer rim perimeter length of 345.6 feet or 11.52 inches per degree of arc. Each of the 30 lintels of the Sarsen Circle had an outer length of 11.52 feet and the number 11.52 is one of the most important astronomical and navigational use numbers of antiquity. This diameter (3.456 inches) within the Bush Barrow Lozenge is 1.152 inches X 3.
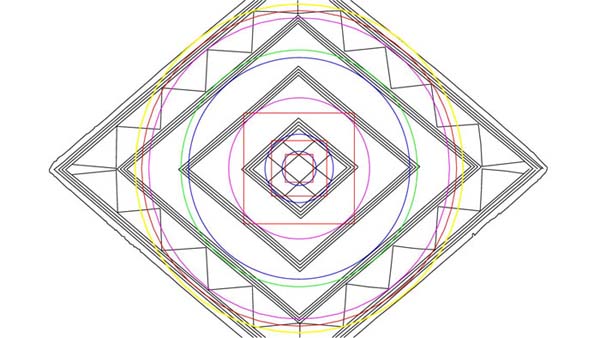
Figure 18: The last 3 coded circles defining the inner and outer limits of the
most outward diamond, as well as the edge limits of the lozenge. The magenta
circle is 4.4 inches in diameter. This was a leading navigational code of the
"11" series and 44 feet = 528 inches, alluding to the "mile".
Trigonometry dictates that the flat floor atop the Great Pyramid had to be 44
feet square or 528 inches per side. The red circle sweeping to the outmost pattern
line is 4.608 inches in diameter. This is an expression of the 11.52 code…4.608
= 1.152 X 4. The outer yellow circle has a diameter of 4.8 inches. The height
of the Great Pyramid was intended to code 480 feet of vertical height to where
lines coming up each diagonal face met at a common point 27 feet above the altar
floor. Trigonometry dictates that the position of intersection would have been
closer to 481 feet. The increment of 4.8 feet to express 1-degree of arc was
very important to navigation, especially when working in linear distances of
100 fathoms.
In this exercise of working from the centre of the lozenge outward according to expanding circles we have encountered a variety of codes. Let's now put some expanding circles into family groups.
THE 11.52 SERIES.
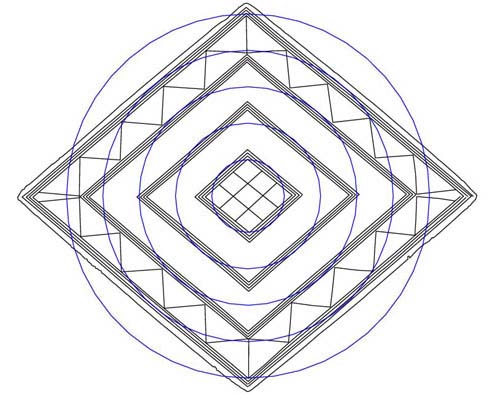
Figure 19: Subtle distortions in the symmetry of each diamond allow for
additional readings to one side of a diamond as opposed to its opposite side.
Ancient astronomers more often than not made their standing stone circles slightly
elliptical for the same purpose, that of cramming in extra codes. The Stonehenge
site most certainly follows this modus operandi in its circle coding.
The above circles have diameters of 1.152, 2.304, 3.456, 4.608 & 5.76 inches
respectively, which are a 1.152 mathematical progression.
THE "11" SERIES.
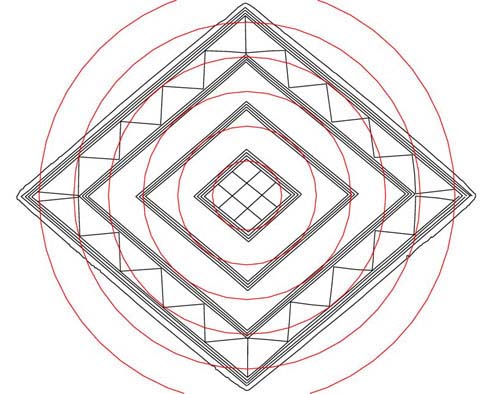
Figure 20: The priest owner of the lozenge would have known empirically which
lines within the lozenge related to a particular family of mathematical progressions.
The 3 larger circles shown resolve to chevron points and the others to particular
lines of the inner diamonds. This is an "11" series, used for navigation
and the circles expand from 1.1, 2.2, 3.3, 4.4, 5.5 & 6.6 inches respectively.
These numbers relate to the league (16500 feet), mile (5280 feet), furlong (660
feet), chain (66 feet), rod/ perch (16.5 feet), fathom (5.5 feet) and link (7.92
inches).
THE GREAT PYRAMID CODING.
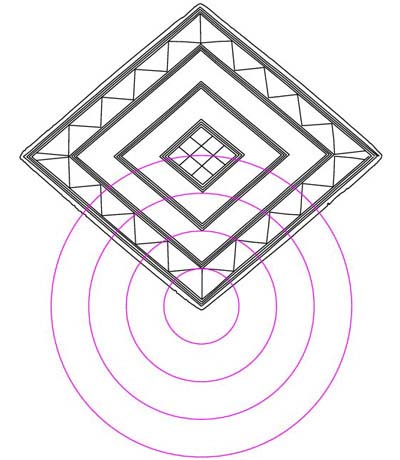
Figure 21: this is a very important mathematical progression that positively
links the Bush Barrow Lozenge to the base dimensions of the Great Pyramid of
Egypt. Let's go in closer to see what's happening.
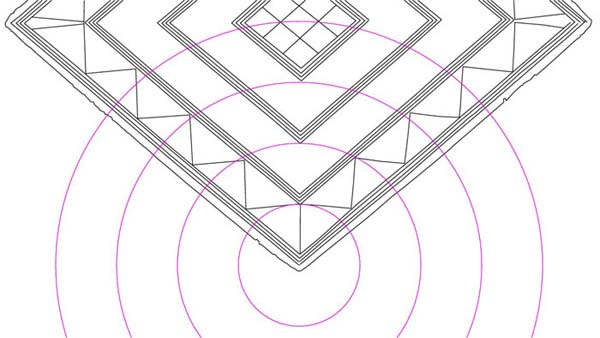
Figure 22: The most prominent structure for both providing and setting a "world
standard" for standing stone circles and other universally distributed
coded structures was the Great Pyramid of Egypt. It had a base length of 756
feet and from this very versatile number or marginal variations on it (756.25
feet…11 series or 755.0824867…PHI series) the ancient parcel of astronomical/
navigational codes were derived. It was of extreme importance to encode the
base dimensions of the Great Pyramid into the Bush Barrow Lozenge for ongoing
mnemonic reference.
The circles are centred on the bottom pattern point and expand at radius values
of .756, 1.512, 2.268 & 3.024 inches respectively. This relates from 1 to
4 side values of the Great Pyramid, which were 756, 1512, 2268, & 3024 feet
respectively.
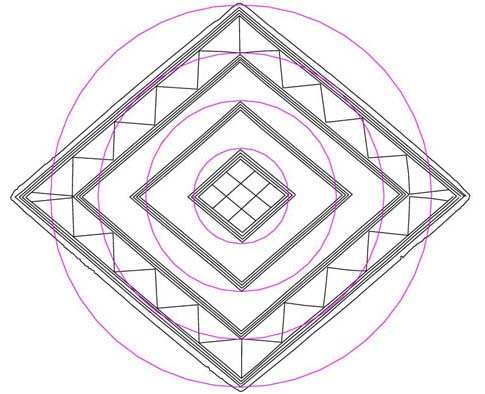
Figure 23: The Great Pyramid mathematical progression emanating out from
the centre of the lozenge and resolving to the top and bottom points of each
consecutive diamond. As has been stated, subtle deliberate variations in the
symmetry of the lozenge were inbuilt and the largest circle marginally misses
its mark at the top. This is because other coded values had to use that region
as their fulcrum.