"Most of what has been written about Stonehenge is nonsense or speculation," said R.J.C. Atkinson, archaeologist from University College, Cardiff. "No one will ever have a clue what its significance was."
The fact is that our enlightened ancestors did all in their power to show us the profound meanings of the Megalithic or Bronze Age monuments and left glaringly clear indicators of purpose and function.
It is an indictment on our scholars that they have been unable to unlock the simple mathematical codes, which are encrypted into the Stonehenge observatory or its pyramid predecessors.
It is admitted that the process of code extraction can be rather involved, as our forebears used layer upon layer of astronomical/ navigational numbers in their worldwide explorations and astronomical endeavours.
We will now sift through the more obscure component positions of Stonehenge, one by one and subject the individual parts or features of the site to mathematical scrutiny for identification of repetitive formulas.
The Stonehenge observatory, in its most apparent overall circle diameter, was built to 1/2 the length value of the Great Pyramid of Egypt.
Professor Alexander Thom said the following concerning the, sometimes, elliptical nature of standing stone observatory circles: 'builders occasionally distorted circular monuments, to make the relationship perfect and that this is at the root of the custom of creating oval rings' (see Stonehenge, Neolithic Man and the Cosmos, by John North, pg. 302).
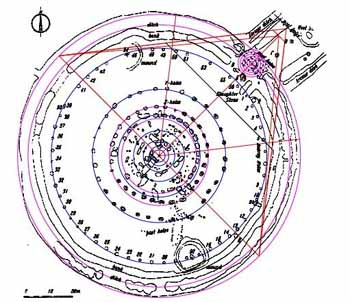
Figure 10: The outermost circle shown (magenta coloured) has a diameter of 378 feet and this value is 1/2 the base length of the Great Pyramid. Note how the circle relates perfectly with the majority of the Stonehenge site, especially at the azimuths of 45-degrees & 225-degrees. There are slight discrepancies at 135-degrees & 315-degrees, but the best overall description of an encasing circle for the Stonehenge site would be one of 378 feet diameter.
When an exact 1/2 scale geometric representation of the Great Pyramid is incorporated into the Stonehenge monument's dimensions, a number of excellent relationships are seen to occur. Lines extending from both sides of the baseline and set to an angle of 51.84-degrees (The Great Pyramid's side diagonal angle) converge upon and precisely touch a post marker on the Avenue. The post was obviously placed to record this relationship to the Great Pyramid. Alternatively, lines from the base, which brush the PHI limits of the Aubrey Circle, converge upon a point consistent with the Pyramid's circumnavigating terrace or altar top (set to heights of 450 feet for the terrace or 453.049492 for the altar top). These values are halved to fit the Stonehenge ratio. All factors point to Stonehenge's extremity circle dimensions being indelibly linked to the measurement codes of the Great Pyramid and many added relationships continue to occur in circle sizes or component positions throughout the site.
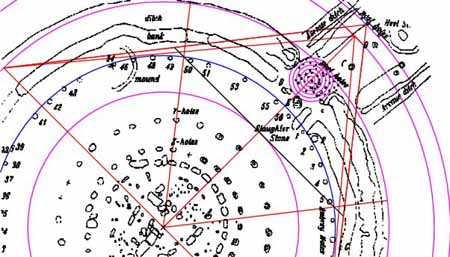
Figure 11: Let's now consider the pyramid geometry in slightly more expanded detail. Starting at the outermost magenta coloured circle, a precisely placed post designates the apex position of a "capstone included" Great Pyramid. The same circle, which brushes the pyramid apex, is also clearly marked by a post or stone component adjacent to the Avenue ditch. This circle would code, essentially, 480 feet of height on the Great Pyramid, from ground level to the theoretical apex of its symbolic capstone. It is here shown as 240.4 feet in radius, as the true value of the pyramid's vertical height would have gone to about 480.8 feet.
The 2nd inward magenta circle designates the true height of the Great Pyramid.
The 3rd inward magenta circle has a diameter of 378 feet and contains Stonehenge.
The 4th inward magenta circle (113.262373 feet radius) extends to a line running between posts 5 & 50 of the Aubrey Circle. This renders 1/4th the height value of the Great Pyramid (453.049492 feet true or 168 Megalithic Yards). This circle can also be interpreted to mean 113.4 feet radius and relate, in a dynamic, way to a major lunar cycle code.
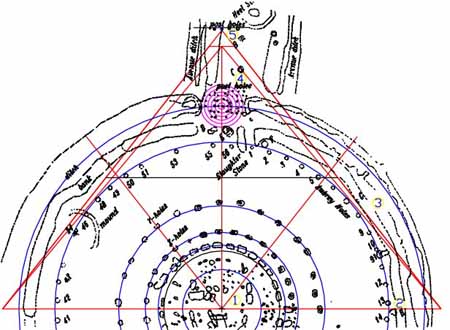
Figure 12: The Great Pyramid's half ratio, two dimensional, flat plane geometry in the Stonehenge layout. Note the numbered positions to the right-hand side of the site:
(1). This designates site centre, which position is found by crossing lines between Stonehenge's 4 "Station Stones".
(2). A stone marker adjacent to but just outside the Aubrey Circle clearly designates the "pyramid" baseline at 135-degrees azimuth from site centre to the north-eastern edge of the stone. The stone itself carries the official designation of component "H" on the Stonehenge site plan. It would be interesting to find out if a marker, slightly beyond the ditch, once marked the intersection of pyramid baseline and diagonal side (hypotenuse).
(3). This region of the site seems to lend itself to indicating both the Great Pyramid's face angle and the height of the altar floor, in the way that lines relate to site contours or brush the Aubrey posts, then carry on to positions of the Avenue.
(4). The stone or post position, officially designated as "C", appears to mark the line from the pyramid's 135-degree azimuth base extremity to the altar top or altar path, with the Aubrey post 7's exterior providing an interim part of that line.
(5). The post at the end of the Avenue, which precisely marks the symbolic apex position of the 1/2 scale Great Pyramid on site. The side angle of this Great Pyramid, two-dimensional replica is 51.84-degrees.
It is quite obvious from post and stone positions, plus the diameter of the Stonehenge encasing circle, that the Great Pyramid provided the measurement inspiration for the creation of Stonehenge. There are too many precise hits between adjacent, opposite and hypotenuse positions, of a perfectly 1/2 scaled Great Pyramid, to doubt Stonehenge's affiliation to the Great Pyramid's geometry.
51.84-DEGREES, 25920 YEARS (PRECESSION) & THE SOLAR YEAR.
The Heel Stone provides the most extended known position of the Stonehenge site and its purpose has never, quite, been fully resolved. It is precisely located to indicate primary codes. Let's explore the probabilities:
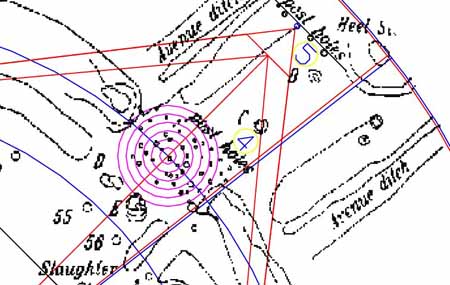
Figure 13: The Heel Stone is shown in the upper right-hand corner of this picture and it's south-western side, as well as exterior face, allude very strongly to known, repetitive codes. It's difficult to know whether the Heel Stone has slumped marginally in the thousands of years since it was precisely erected and positioned, but indications are that it's relative position is still excellent as a code bearing repository.
Two lines, one red and one blue, originating at the epicentre of Stonehenge, are seen to traverse and terminate on the Heel Stone. Simultaneously, two circles, one red and one blue, originating at the site's epicentre, brush positions of the outmost face of the Heel stone. Further inward on the Avenue, a post sitting adjacent to the Avenue set of circles (marked by post positions and coloured magenta) relates to the out-flowing lines that run from site centre to the Heel Stone. Here are the several codes indicated by the Heel Stone's position:
(1). The red line originating at site centre is at an azimuth angle of 51.84 degrees and extends for 259.2 feet. The 51.84-figure relates to the angle of the Great Pyramid. It is also 1/500th of 25920, which was the number used by the ancient astronomer/ mathematicians to describe the duration, in years, of the Precession of the Equinoxes.
(2). The red circle has a diameter of 518.4 feet and a radius value of 259.2 feet. Note how closely it relates to the extremity face of the Heel Stone. It's very probable that there was some tapering or modification to the Heel stone, such that the 51.84-angle and the 259.20 feet distance occurred at a marked position of the Heel Stone.
(3) Whenever 259.20 was anciently present in a distance or length, it also inferred a 2nd coded value of 260. This occurred in the diagonal side length value of Silbury Hill (259.20 feet or 260 feet). It also occurred in the length value of the Stone of Destiny (the Stone of Scone), upon which Irish, then Scottish, then English Monarchs received their coronations over a period in excess of two thousand years. The carefully fashioned length of the Stone of Scone was designed to be slightly less than 26 inches (25.92"). The "26" number relates to the Sabbatical Calendar system and the duration of the Solar Year (52 weeks...26 X 2). The blue circle brushing the outer face of the Heel Stone has a diameter of 520 feet or a radius of 260 feet.
(4). The blue line extends 260 feet from site centre and brushes the south-western face of the Heel Stone. It has an azimuth angle of 52.17857143-degrees and this is 1/7th of 365.25 days...the duration of the true Solar year. Under the Sabbatical Calendar system, the passage of time was counted in increments of 7-days, 14-biweeks, 28-day months & 52-weeks annually, as well as 13-months per year or 26-weeks from equinox to equinox.
The most precise coded relationship, visually, would seem to relate to the 260 feet distance from site centre and the 52.17857143-azimuth angle (1/7th of 365.25). We can see, however, from the position of the post marker adjacent to the Avenue set of concentric resolving circles that the 259.20 feet code was equally important.
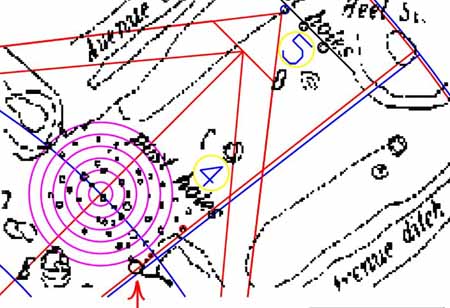
Figure 14: A red arrow points toward a significant post marker, sitting adjacent to the Avenue circles. The position of this post verifies the 52.17857143-degree angle (blue line) to the side of the Heel Stone and 3 further post markers indicate the 51.84-degree angle (red line). The large post marker's centre was coded to reside 169.2 feet from site centre or 90 feet back from the Heel Stone to provide a sought after ratio value...169.2 ( 90 = 2.88. This is the same ratio value that exists between the inner Sarsen Circle (100 feet) and the Aubrey Circle (288 feet)...1: 2.88.
MULTIPLE CIRCULAR & LINEAR CODES.
We will now begin to identify the purpose behind placing individual component stones and posts in the Avenue section of the site and extract anew the intended codes relative to positions. Features of the embankment or mounds, etc mark some of the more inward codes. Let's return to the Heel Stone and work inward from that most extreme position.
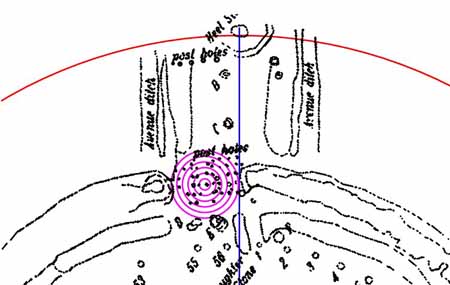
Figure 15: The likeliest code for the inner side of the Heel Stone relates to a circle (red) of 254.8403393 feet radius or 509.6806786 feet diameter. This circle diameter is exactly 189 Megalithic Yards of 32.360678 inches each. One quarter of the base length of the Great Pyramid of Egypt was 189 feet and the 3 main pyramid structures of the Giza Plateau are built within the confines of a "grid" with each grid square measuring 189 X 189 feet.
Also, this diameter (509.6806786 feet) carries a code for the side diagonal length (assuming a symbolic capstone and pointed apex) of the Great Pyramid in feet...in accordance with the PHI method for calculating that length.
There were two ways of calculating the side diagonal length of the Great Pyramid to the theoretical point where lines rising from each base-side, up the face, would converge and meet 27 feet above the Pyramid's flat altar floor. The first method was by trigonometry, using 1/2 the base length (378 feet) of the pyramid (adjacent) and a side angle of 51.84 degrees. This rendered a diagonal side length value of 611.7894615 feet.
Alternatively, the ancient mathematicians also coded this length to work to PHI...which meant 378 feet X 1.6180339 (PHI) = 611.6168142 feet (2 inches shorter than by the trig method) or 226.8 MY (which is 1/2 of 453.6... note the Pyramid's height in feet to the top of its altar floor was 453.6 feet under its sexagesimal assignment).
The inner face of the Heel stone, as shown, complies closely to a circle of 509.6806786 feet diameter. In inches this represents 6116.168142"...producing the same set of numbers (X 10) as the Great Pyramid's PHI rendered length in feet (611.6168142 feet). Therefore, the ratio relationship between this Stonehenge diameter and the PHI generated diagonal side length of the (capstone included) Great Pyramid was 1 to 1.2.